The SM-106 will work on all '69-'71 trucks, as long as they have the later style steering wheel and column. I can't speak to the car applications, but do know there are several styles and our truck part # crosses to some.nytemuvr wrote:Good place, got one for a D100(#106) for my Challenger at half the price for what was listed for Challengers, they use basically the same harnesses (some wires are different colors) for trucks and Challengers. But the 106 didn't fit '67-'69s trucks, on my '68 D100 (made from pot metal and the wheel for the horn ring contact is 90 degrees off). I think it's a mistake in their listing. Talked to a CS person there and they said they would take the '67-'69 of that description. You think getting to that plug on the firewall is hard to get to on a truck, lots more fun in a Challenger, need to be a contortionist.PwrWgnWalt wrote:Eighth Topic - Steering Column rebuild and Turn Signal Switch replacement
'69-'71 Electrical System - component by component
-
PwrWgnWalt

- Sweptline.ORG Member

- Posts: 389
- Joined: Wed Dec 31, 1969 6:00 pm
- City: Butte
- State: MT
Re: '69-'71 Electrical System - component by component
Last edited by PwrWgnWalt on Wed Apr 15, 2015 11:43 pm, edited 2 times in total.
-
JimE
- Sweptline.ORG Pioneer

- Posts: 1906
- Joined: Wed Dec 31, 1969 6:00 pm
- City: Glendale,
- State: AZ
- Location: Glendale, AZ
Re: '69-'71 Electrical System - component by component
I've replaced turn signal switches in 4 of the 6 swepts I have owned in the past 20+ years. I just ordered the SM-106 for my 70 swept, and am looking forward to installing it. Happy Holidays, JimPwrWgnWalt wrote:I used a very small regular screwdriver, pushed down each side of the connector and pried so it pushes in the little tab on each side. Used 1 small, jewelers screwdriver.Roxyflash wrote:I just tackled pulling one of these apart I have several terminal tools but couldn't find the right one I made one from a pair of tweezers to get the wires removed from the plastic connector what is the proper tool for the job as I need to take another one apart

Re: '69-'71 Electrical System - component by component
I too wish I would have looked at these sooner. The third topic solved my tach and alternator problem by connecting the wires per the diagram. A big THANK YOU, from BigG.
Re: '69-'71 Electrical System - component by component
Great stuff, third topic saved my day. Tach and amp gauge now work, THANKS AGAIN, BigG
-
PwrWgnWalt
- Sweptline.ORG Member
- Posts: 389
- Joined: Wed Dec 31, 1969 6:00 pm
- City: Butte
- State: MT
Re: '69-'71 Electrical System - component by component
Glad it helped, BigG!
-
crusty
- Sweptline.ORG Pioneer
- Posts: 809
- Joined: Sun Feb 24, 2008 6:35 am
- City: Yelm
- State: WA
- Location: Somewhere in
Re: '69-'71 Electrical System - component by component
How much do you know about the different wiper motors? The reason I ask is because I am using a 70(?) wiring harness out of a parts truck I got, but have the older cab. I was going to swap in the newer motor, but they aren't the same.
What a mess.
-
PwrWgnWalt
- Sweptline.ORG Member
- Posts: 389
- Joined: Wed Dec 31, 1969 6:00 pm
- City: Butte
- State: MT
Re: '69-'71 Electrical System - component by component
Ninth topic - Alternator Wiring Adaptation
- or - How to Drastically Improve your Entire Electrical System
Here are the 4 Steps to doing this "Alternator Wiring Adaptation"... a factory specified fix to the problematic bulkhead connection serving the Alternator and Ammeter wiring systems. Dodge used this on many Camper Specials and Police units of the era, due to higher output alternators and heavier electrical system loads. It was pretty simple, once I knew what to do. The scan of the Service Book page shows this all pretty well, it just didn't tell me what to do with the existing wiring at the Ammeter. (click pictures for full view)
1. Get heavy gauge wires to run the new lines. I used wires from a 1971 D200 Camper Special parts truck that had this done long ago; looks like either 8 or 6 ga. stranded wire. Use whatever fits your situation - at your own risk.
new BLACK wire- runs from the BATT post of the Alternator straight thru the firewall and to the Ammeter 'Charge' side, where the original black wires are (the original wires stay there, along with this new wire).
new RED wire - runs from the New Terminal Block on the inner fender (by the starter relay) straight thru the firewall to the Ammeter 'Discharge' side, where the original red wires are (the original wires stay there, along with this new wire).
Here's how that looks going thru the firewall...

2. As for the New Terminal Block - I got one online somewhere (bought two, actually). The insulator cap is off for this picture - be sure to use one because if something touches this post and the chassis or body (ground), sparks WILL fly!

The New Fusible Link goes from the Starter Relay (large post) to the New Terminal Block.
Then the New Red Wire goes directly to the Ammeter from the New Terminal Block (hard to see, but is at upper left, with yellow around the ring connector. Routes up by the firewall bulkhead connectors, held by the existing chassis wire clips, and then thru firewall, as pictured in Step #1)
Here's what the Starter Relay area looks like...

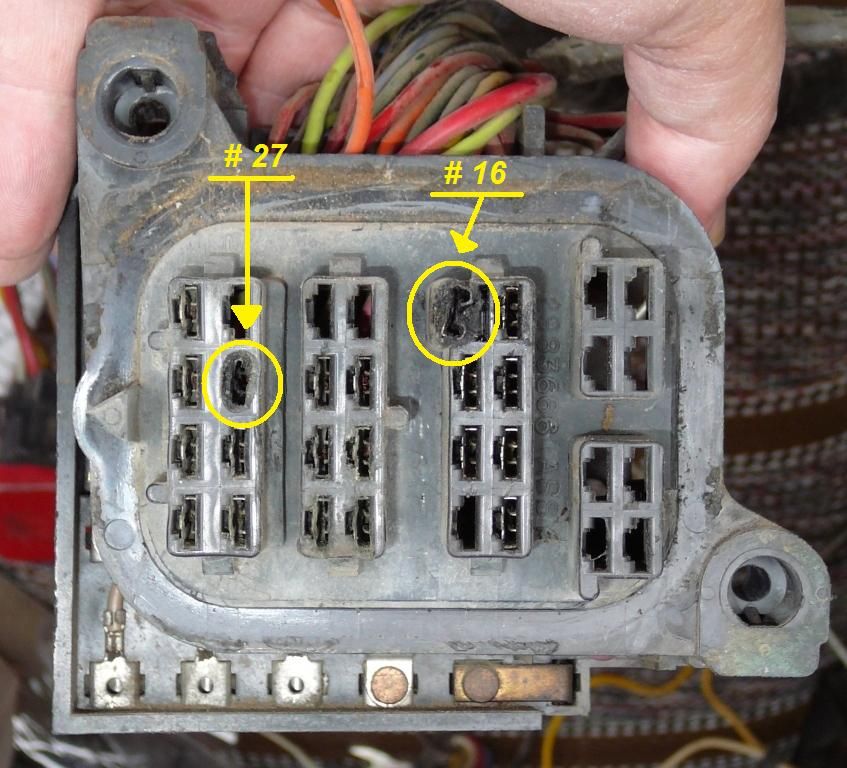
3. As the Service Manual Picture shows, a second Fusible Link replaces the original routing of the wires from the Alternator and from the Starter Relay at the Bulkhead connector block. Supposedly, if your existing fusible link in slot #27 is in good shape, you can just plug the other end into slot #16. My wiring was a disaster, so I made a new one (got a Fusible Link from NAPA).
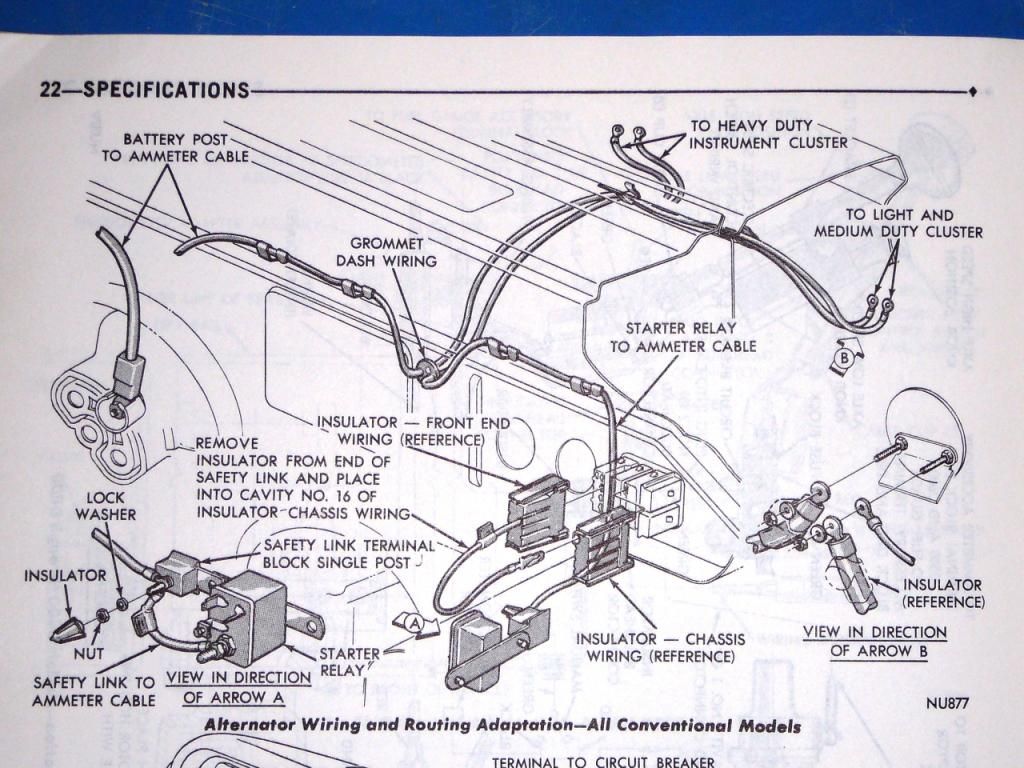
4. Here's where the Fusible Link in step 3 plugs in to... it bridges between (thus connecting) firewall bulkhead terminals #16 and #27. This adaptation solves the issue of melted connector slots! This step is important to finish the circuitry and have everything work as intended (as good as - or better - than new!)
I did it this way because I wanted to keep it simple and keep it stock, but eliminate the poor connectivity at the bulkhead due to aging and corrosion. Wish I'd done this years ago!
Everything works very well - bright headlights, strong heater blower, wipers steady... no more accessory slowness or dim headlights when at a stoplight!
- Walt

- or - How to Drastically Improve your Entire Electrical System
Here are the 4 Steps to doing this "Alternator Wiring Adaptation"... a factory specified fix to the problematic bulkhead connection serving the Alternator and Ammeter wiring systems. Dodge used this on many Camper Specials and Police units of the era, due to higher output alternators and heavier electrical system loads. It was pretty simple, once I knew what to do. The scan of the Service Book page shows this all pretty well, it just didn't tell me what to do with the existing wiring at the Ammeter. (click pictures for full view)
1. Get heavy gauge wires to run the new lines. I used wires from a 1971 D200 Camper Special parts truck that had this done long ago; looks like either 8 or 6 ga. stranded wire. Use whatever fits your situation - at your own risk.
new BLACK wire- runs from the BATT post of the Alternator straight thru the firewall and to the Ammeter 'Charge' side, where the original black wires are (the original wires stay there, along with this new wire).
new RED wire - runs from the New Terminal Block on the inner fender (by the starter relay) straight thru the firewall to the Ammeter 'Discharge' side, where the original red wires are (the original wires stay there, along with this new wire).
Here's how that looks going thru the firewall...

2. As for the New Terminal Block - I got one online somewhere (bought two, actually). The insulator cap is off for this picture - be sure to use one because if something touches this post and the chassis or body (ground), sparks WILL fly!
The New Fusible Link goes from the Starter Relay (large post) to the New Terminal Block.
Then the New Red Wire goes directly to the Ammeter from the New Terminal Block (hard to see, but is at upper left, with yellow around the ring connector. Routes up by the firewall bulkhead connectors, held by the existing chassis wire clips, and then thru firewall, as pictured in Step #1)
Here's what the Starter Relay area looks like...

3. As the Service Manual Picture shows, a second Fusible Link replaces the original routing of the wires from the Alternator and from the Starter Relay at the Bulkhead connector block. Supposedly, if your existing fusible link in slot #27 is in good shape, you can just plug the other end into slot #16. My wiring was a disaster, so I made a new one (got a Fusible Link from NAPA).

4. Here's where the Fusible Link in step 3 plugs in to... it bridges between (thus connecting) firewall bulkhead terminals #16 and #27. This adaptation solves the issue of melted connector slots! This step is important to finish the circuitry and have everything work as intended (as good as - or better - than new!)

I did it this way because I wanted to keep it simple and keep it stock, but eliminate the poor connectivity at the bulkhead due to aging and corrosion. Wish I'd done this years ago!
Everything works very well - bright headlights, strong heater blower, wipers steady... no more accessory slowness or dim headlights when at a stoplight!
- Walt
-
RobertGilliam
- Sweptline.ORG Member
- Posts: 373
- Joined: Sat Jul 27, 2013 5:57 am
- City: Clinton
- State: TN
Re: '69-'71 Electrical System - component by component
Finally got mine working great! Thanks

Re: '69-'71 Electrical System - component by component
PwrWgnWalt thanks so much for all the great electric info! I have the common flickering headlight/dash issue in my 66 D200. Can you (or any Dodge genus here) give me any suggestions for factory specified fix to the problematic bulkhead connection in the older models? Pic below of my bulkhead connections. Also, any way to do this fix and still have the ammeter work?
Cheers - W

Cheers - W