Footwell Protective Coating
-
martincom

- Sweptline.ORG Member

- Posts: 448
- Joined: Thu Jul 30, 2020 10:04 am
- City: Five Points
- State: AL
Footwell Protective Coating
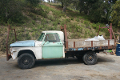
We sprayed the box, as a part of my D100 re-paint, with color match spray-in bedliner. We coated the cab footwells at the same time. This should be far more durable than paint, scratch resistant, and not slippery when wet. Time will tell.
1*1971 D100 318 A/T
1*1970 Charger R/T 440-6PK A/T
2*1969 Daytona Charger 440 A/T
1*1969 Coronet R/T awaiting restoration
1*1969 Torino Talladega awaiting restoration
1*1970 Charger R/T 440-6PK A/T
2*1969 Daytona Charger 440 A/T
1*1969 Coronet R/T awaiting restoration
1*1969 Torino Talladega awaiting restoration
-
Wildergarten
- Sweptline.ORG Pioneer

- Posts: 1768
- Joined: Wed Mar 21, 2018 5:27 pm
- City: Los Gatos
- State: CA
- Contact:
Re: Footwell Protective Coating
Hopefully, it keeps its mouth shut.
Looks good! Helluva fine idea; I wonder if they sell quarts? How did you stick down the HushMat?
'69 W200 (thumbnail)
'68 W200 (RIP)
'68 W200 383 NP435 3.53
'67 W200 383 NP435 4.10 w overload springs, Dana 60, PTO winch & flatbed dump, racks, crane, c-air (Max)
Mark Vande Pol
Wildergarten.org
'68 W200 (RIP)
'68 W200 383 NP435 3.53
'67 W200 383 NP435 4.10 w overload springs, Dana 60, PTO winch & flatbed dump, racks, crane, c-air (Max)
Mark Vande Pol
Wildergarten.org
-
BigBlockTrucks
- Sweptline.ORG Member
- Posts: 448
- Joined: Fri Jan 01, 2021 11:46 pm
- City: Binghamton
- State: NY
Re: Footwell Protective Coating
They do sell quarts but it’s meant to be sprayed out of a specialty spray gun. It’s similar to the gun they spray undercoating with.
Late 65 w 200.
Factory LU-2 winch.
Updates: 205 transfer case,4.10 gears, disc brake Dana 60 front with lock out hubs
440 repower in the works
60 d100
383 with 727
4 wheel disc
3.73 geared rear
Factory LU-2 winch.
Updates: 205 transfer case,4.10 gears, disc brake Dana 60 front with lock out hubs
440 repower in the works
60 d100
383 with 727
4 wheel disc
3.73 geared rear
-
martincom
- Sweptline.ORG Member
- Posts: 448
- Joined: Thu Jul 30, 2020 10:04 am
- City: Five Points
- State: AL
Re: Footwell Protective Coating
The Hushmat is a "peel-n-stick" product. It has a paper release backing. It is pretty sticky, but they claim it can pulled backup within 20 minutes of application. I would assume that is before it is rolled. I would agree, if it is not too large of an area to be pulled back up. The Hushmat President is a "hands-on" type of guy. They have a number of YouTube videos detailing installation of their product. There is also a number of similar, competitive, products on the market. I went with the Hushmat, as it was obvious the owner has a commitment to it, and it was made in the USA.Wildergarten wrote: ↑Wed Apr 07, 2021 10:44 amLooks good! Helluva fine idea; I wonder if they sell quarts? How did you stick down the HushMat?
It took the largest "ultra bulk pack", 72 sq ft, to do the truck. I applied it to the rear cab wall and corners, the floor pan, the roof, and inside of the doors affixed to the outer door skin. You really hear/feel the difference with the door application. The doors have a "solid and quiet" feel when closing. I applied it to the door skin before I re-installed the door glass and vent wing assembly. In this manner, I was able to slide large pieces of it through the glass opening and still had room to get my hands inside the the door to affix it.
I taped the Hushmat joints with HVAC foil tape, also.
The road noise and wind noise was pretty deafening, before the body restoration, at highway speeds. I replaced all the rubber, door weatherstripping, door glass channel rubber, vent wing rubber, windshield and rear glass boots, and replaced the rubber floor mat with carpet. I welded up or sealed any holes in the firewall, from previous owner accessory installations, and was pretty anal about sealing the cab up. It is substantially quieter now, though there is still some wind noise at highway speeds. The downside is the cab is so airtight now, the doors require a fair amount of effort to fully latch when the windows are rolled up. If I had to do it over again and if I had re-located the fuel tank,I'd graft in a piece of rear cab wall from a newer truck, with the air release vent/flapper, so the doors would be as easy to close with the door glass closed as open.
1*1971 D100 318 A/T
1*1970 Charger R/T 440-6PK A/T
2*1969 Daytona Charger 440 A/T
1*1969 Coronet R/T awaiting restoration
1*1969 Torino Talladega awaiting restoration
1*1970 Charger R/T 440-6PK A/T
2*1969 Daytona Charger 440 A/T
1*1969 Coronet R/T awaiting restoration
1*1969 Torino Talladega awaiting restoration
-
Wildergarten
- Sweptline.ORG Pioneer
- Posts: 1768
- Joined: Wed Mar 21, 2018 5:27 pm
- City: Los Gatos
- State: CA
- Contact:
Re: Footwell Protective Coating
Great answer as usual martincom, thank you. I'll try to reciprocate.
You'll be doing carpets. I plan rubber mats (albeit I have no idea how), so when I get there, I'll definitely pick your brain.
I am assuming you painted the insides of the doors? If you did, how long would you wait before applying the mat to allow the paint to complete outgassing? I am also guessing you painted the cab interior and exterior as separate operations? If so, I'd like to know how and where you masked the doors. Bed coat going down after paint (with the same question about outgassing)?
You'll be doing carpets. I plan rubber mats (albeit I have no idea how), so when I get there, I'll definitely pick your brain.
If somebody makes one that's tall and skinny, there may be a spot on the driver's side behind the filler neck. I'll get dimensions on it and look in my other truck for to see if there is minimal interference from the tank and get back to you. It would need a convolution with a filter for noise and a way to keep the mice out (Toyota makes one https://www.ebay.com/itm/264802663525?c ... gJ9TfD_BwE)
'69 W200 (thumbnail)
'68 W200 (RIP)
'68 W200 383 NP435 3.53
'67 W200 383 NP435 4.10 w overload springs, Dana 60, PTO winch & flatbed dump, racks, crane, c-air (Max)
Mark Vande Pol
Wildergarten.org
'68 W200 (RIP)
'68 W200 383 NP435 3.53
'67 W200 383 NP435 4.10 w overload springs, Dana 60, PTO winch & flatbed dump, racks, crane, c-air (Max)
Mark Vande Pol
Wildergarten.org
-
martincom
- Sweptline.ORG Member
- Posts: 448
- Joined: Thu Jul 30, 2020 10:04 am
- City: Five Points
- State: AL
Re: Footwell Protective Coating
I contracted the paint work as the dust just doesn't cohabitate with other things going on in my shop and my workshop is attached to my home. I do want to remain married. So I was only there when the painter needed help, deliver supplies I was sourcing, and pre-payment inspections. I stripped the truck and re-assembled it.Wildergarten wrote: ↑Thu Apr 08, 2021 8:03 amI am assuming you painted the insides of the doors? If you did, how long would you wait before applying the mat to allow the paint to complete outgassing? I am also guessing you painted the cab interior and exterior as separate operations? If so, I'd like to know how and where you masked the doors. Bed coat going down after paint (with the same question about outgassing)?
You'll be doing carpets. I plan rubber mats (albeit I have no idea how), so when I get there, I'll definitely pick your brain.
If somebody makes one that's tall and skinny, there may be a spot on the driver's side behind the filler neck. I'll get dimensions on it and look in my other truck for to see if there is minimal interference from the tank and get back to you. It would need a convolution with a filter for noise and a way to keep the mice out (Toyota makes one https://www.ebay.com/itm/264802663525?c ... gJ9TfD_BwE)
Yes, we painted the inside panel and jamb. The Hushmat was affixed to the inside of the exterior door skin, however. It would be impossible to spray that. I did have some rust pinholes at the bottom of the doors we had to weld in some patches. We coated the bottom portion of the inside of the door with POR15, to encapsulate the surface rust and seal up the weld area. It was well over a month after the POR15 application before the Hushmat was affixed.
Originally, the cab interior paint was in excellent condition and I had no plans to paint anything on the interior other than the door interiors and the kick panels. However, once we completed painting the cab, doors, fender and hood, we found a glaring difference in the paint shade. I was concerned about the top coat and spray-in bedliner matching. As such, we went with paint codes rather than a camera paint match.
The doors were painted off the vehicle, suspended on wires from the hinge bolts. So they were painted inside and out at the same time. We had mounted the doors, on rebuilt hinges, when doing the body work and aligned/fitted them. We then drilled the hinges/doors with a 3/16 bit to create an alignment hole, before removing the door. So when re-assembling all we had to do was insert a 3/16 rod to achieve alignment and prevent chipping the paint while doing so. I had disassembled the hinges, had them sandblasted, machined the hinge arms for bushings & grease zerks, and then primed them. I didn't re-assemble them until fully primed, to prevent rust. The hinges were top coated while installed in the cab.
I wasn't there when the bedliner was applied, either. The box interior was not re-top coated before application. From the tell-tale signs, it appears as if the box interior was prepped to remove any loose paint and surface rust. Cleaned and coated with POR15, to encapsulate any rust. The color match spary-in bedliner was applied over the POR15. As to the footwells, it was at least two weeks after the cab had been top coated before the bedliner was applied to the footwells.
This truck had a fairly new rubber mat. Like carpet, you purchase them molded to fit the truck floor pan. The rubber mats rip extremely easily. I should have removed it, as the painter ripped it. I had planned on replacing it with carpet at a later date. The heat molded carpet extends all the way under the seat and even the fuel tank area, for those that re-locate it. The carpet wears better and is a much better sound dampener. If you are worried about wear and mud, go with carpet and then install a DeeZee full width removable rubber mat over it. They're tough and won't rip.
The hush mat is also an excellent water barrier. It is very similar to roofing ice and snow barrier. So it will prevent moisture from reaching your floor pans. You can overlap the seams to seal them and utilize the HVAC foil tape. Here in MN, floor pans typically didn't rust out from the outside in, but rather from the inside out. Carpets would become wet from snow melting off footwear and tracked into the car. It seeps through the carpet and saturates the jute padding. They never dried out. Add in a little dirt and dust and you have an excellent rust making machine. Back before Hushmat (when dinosaurs roamed the earth, according to my daughters) when restoring my high school car, I sprayed the floor pan interior with 3M Bodyshutz undercoating. I then removed the jute pad from the carpet and placed it over the undercutting. I would then lay down 4mil plastic sheeting over that. Finally, the carpet over the plastic. The idea with the plastic was to stop the water/snow tracked into the car from saturating the jute padding. If only the carpet was wet, it would dry out--eventually. The Hushmat makes this a much better an easier solution.
The truck paint work is complete and the truck has been re-assembled. I only have a few minor things to complete, such as the headliner (waiting on SMS). So I'm well beyond adding in any cab vents.
1*1971 D100 318 A/T
1*1970 Charger R/T 440-6PK A/T
2*1969 Daytona Charger 440 A/T
1*1969 Coronet R/T awaiting restoration
1*1969 Torino Talladega awaiting restoration
1*1970 Charger R/T 440-6PK A/T
2*1969 Daytona Charger 440 A/T
1*1969 Coronet R/T awaiting restoration
1*1969 Torino Talladega awaiting restoration
-
martincom
- Sweptline.ORG Member
- Posts: 448
- Joined: Thu Jul 30, 2020 10:04 am
- City: Five Points
- State: AL
Re: Footwell Protective Coating
1*1971 D100 318 A/T
1*1970 Charger R/T 440-6PK A/T
2*1969 Daytona Charger 440 A/T
1*1969 Coronet R/T awaiting restoration
1*1969 Torino Talladega awaiting restoration
1*1970 Charger R/T 440-6PK A/T
2*1969 Daytona Charger 440 A/T
1*1969 Coronet R/T awaiting restoration
1*1969 Torino Talladega awaiting restoration
-
Wildergarten
- Sweptline.ORG Pioneer
- Posts: 1768
- Joined: Wed Mar 21, 2018 5:27 pm
- City: Los Gatos
- State: CA
- Contact:
Re: Footwell Protective Coating
Many thanks. I'll be digesting this for quite a while.
Key lesson upon which I'm still rumenating: Just because I can do it doesn't mean I should.
'69 W200 (thumbnail)
'68 W200 (RIP)
'68 W200 383 NP435 3.53
'67 W200 383 NP435 4.10 w overload springs, Dana 60, PTO winch & flatbed dump, racks, crane, c-air (Max)
Mark Vande Pol
Wildergarten.org
'68 W200 (RIP)
'68 W200 383 NP435 3.53
'67 W200 383 NP435 4.10 w overload springs, Dana 60, PTO winch & flatbed dump, racks, crane, c-air (Max)
Mark Vande Pol
Wildergarten.org
-
martincom
- Sweptline.ORG Member
- Posts: 448
- Joined: Thu Jul 30, 2020 10:04 am
- City: Five Points
- State: AL
Re: Footwell Protective Coating
Amen to that. I'd hate to tell you how much $$$ I have invested in this truck.Wildergarten wrote: ↑Fri Apr 09, 2021 9:14 amMany thanks. I'll be digesting this for quite a while.
Key lesson upon which I'm still rumenating: Just because I can do it doesn't mean I should.
1*1971 D100 318 A/T
1*1970 Charger R/T 440-6PK A/T
2*1969 Daytona Charger 440 A/T
1*1969 Coronet R/T awaiting restoration
1*1969 Torino Talladega awaiting restoration
1*1970 Charger R/T 440-6PK A/T
2*1969 Daytona Charger 440 A/T
1*1969 Coronet R/T awaiting restoration
1*1969 Torino Talladega awaiting restoration
-
Wildergarten
- Sweptline.ORG Pioneer
- Posts: 1768
- Joined: Wed Mar 21, 2018 5:27 pm
- City: Los Gatos
- State: CA
- Contact:
Re: Footwell Protective Coating
I made a conscious decision early on that it was better not to know and for several very simple and practical reasons:
- The truck has real multifaceted jobs to do, requiring torque, load capacity, and modularity.
- A new one with equivalent capabilites would cost $150,000, at least.
- Whatever new truck I bought I wouldn't like it one bit; it just doesn't fit me or this property.
- I can maintain this one myself because it's simple and I know every bit of it.
- It's cool. I'll actually feel good driving it (if all goes as planned... hic!).
I suspect that atmospheric carbon dioxide enrichment is having a major effect on vegetative behavior, whether time to maturity, drought tolerance, recovery from herbicides or mechanical trauma... I've seen grasses grow almost a foot in a day. I had a sow thistle this morning six feet tall with a 1-1/2" stem. It's insane. So, no botttle for me until Shabbat, I'm back out to weed until dusk. M
'69 W200 (thumbnail)
'68 W200 (RIP)
'68 W200 383 NP435 3.53
'67 W200 383 NP435 4.10 w overload springs, Dana 60, PTO winch & flatbed dump, racks, crane, c-air (Max)
Mark Vande Pol
Wildergarten.org
'68 W200 (RIP)
'68 W200 383 NP435 3.53
'67 W200 383 NP435 4.10 w overload springs, Dana 60, PTO winch & flatbed dump, racks, crane, c-air (Max)
Mark Vande Pol
Wildergarten.org
-
martincom
- Sweptline.ORG Member
- Posts: 448
- Joined: Thu Jul 30, 2020 10:04 am
- City: Five Points
- State: AL
Re: Footwell Protective Coating
I doubt it. That "enrichment" is actually a trace amount. The Green New Deal or any of President Biden's "climate protection" actions will have an even smaller impact on it in the short term or the next 100 years.Wildergarten wrote: ↑Fri Apr 09, 2021 7:45 pmI suspect that atmospheric carbon dioxide enrichment is having a major effect on vegetative behavior, whether time to maturity, drought tolerance, recovery from herbicides or mechanical trauma... I've seen grasses grow almost a foot in a day. I had a sow thistle this morning six feet tall with a 1-1/2" stem. It's insane. So, no botttle for me until Shabbat, I'm back out to weed until dusk. M
1*1971 D100 318 A/T
1*1970 Charger R/T 440-6PK A/T
2*1969 Daytona Charger 440 A/T
1*1969 Coronet R/T awaiting restoration
1*1969 Torino Talladega awaiting restoration
1*1970 Charger R/T 440-6PK A/T
2*1969 Daytona Charger 440 A/T
1*1969 Coronet R/T awaiting restoration
1*1969 Torino Talladega awaiting restoration
-
Wildergarten
- Sweptline.ORG Pioneer
- Posts: 1768
- Joined: Wed Mar 21, 2018 5:27 pm
- City: Los Gatos
- State: CA
- Contact:
Re: Footwell Protective Coating
My first clue came back in the 1980s. There was a scientist at USDA Forest Service by the name of Sherwood Idso. Dr. Idso grew trees in chambers. Just with the difference between 1980 CO2 values (295ppm) and today (417ppm), pine tree growth accelerated nearly 80%.
Stressed plants, and particularly drought stressed plants (as are found here in California) show nearly 80% growth increases (for reference, please conslut Figure 23 in this publication: http://www.oism.org/pproject/s33p36.htm which is a composite of some 279 published experiments). Most crops, not under such stress, produce now yield about 15-35% more food.
We live in a system that is starved for CO2 compared to the Oligocene when C4 plants first developed. C4 plants include both Poaceae and Asteraceae, which comprise the bulk of the weeds we see today.
I am NOT an environmental alarmist, but compare the magnitude of these changes in growth rates due to CO2 enrichment to those attributed to a 1°C temperature change by the "climate change" left. Those idiots can't even get their story right. The real changes in CO2 levels present both environmental blessings and challenges just like any other change in boundary conditions, and we do need to deal with the latter if only for fuel control around homes, as few responses in nature are linear.
'69 W200 (thumbnail)
'68 W200 (RIP)
'68 W200 383 NP435 3.53
'67 W200 383 NP435 4.10 w overload springs, Dana 60, PTO winch & flatbed dump, racks, crane, c-air (Max)
Mark Vande Pol
Wildergarten.org
'68 W200 (RIP)
'68 W200 383 NP435 3.53
'67 W200 383 NP435 4.10 w overload springs, Dana 60, PTO winch & flatbed dump, racks, crane, c-air (Max)
Mark Vande Pol
Wildergarten.org
-
Red383
- Sweptline.ORG Member
- Posts: 344
- Joined: Tue Dec 18, 2012 7:45 am
- City: Fort Loramie
- State: OH
Re: Footwell Protective Coating
Martincom, what product did they use on your bed liner. I'm thinking about doing a color matched liner at some point. Looks nice.
1965 Dodge D200, 318 4-speed converted to 4x4 with NV4500 trans
-
martincom
- Sweptline.ORG Member
- Posts: 448
- Joined: Thu Jul 30, 2020 10:04 am
- City: Five Points
- State: AL
Re: Footwell Protective Coating
I'll need to check with the painter, as he sourced it. Like most painters, he doesn't keep regular hours and doesn't return phone calls or texts reliably. I've been trying to reach him for a few weeks. I think he went on "vacation" after I paid him.
I do know he sources most of his supplies and paint from Keystone. So I'd speculate that is where the bedliner came from.
1*1971 D100 318 A/T
1*1970 Charger R/T 440-6PK A/T
2*1969 Daytona Charger 440 A/T
1*1969 Coronet R/T awaiting restoration
1*1969 Torino Talladega awaiting restoration
1*1970 Charger R/T 440-6PK A/T
2*1969 Daytona Charger 440 A/T
1*1969 Coronet R/T awaiting restoration
1*1969 Torino Talladega awaiting restoration