Ohhh man, you shouldn't have wasted your money on that rusted out hulk of a cab. I'll be right over there to haul it away and save you from the torment of trying to patch it up.
What'r friends for right?
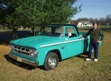
Seriously, it looks fantastic. That's a good start on a world class rebuild.
Looks good! Sure does make a nicer job than just sanding it down. Did it get all the seam sealer out from the seams too? Does the stripper company use any type of metal coating to keep it from rusting? Like just letting it sit in the garage, and the dampness. There used to be a stuff that I can't remember it's name, but after the metal was stripped, you would wipe this stuff on with a sponge and keep the metal wet for a few minutes. Then, you would wash it off with water. This kept the metal from forming rust on it, and it did not affect paint. Was it called metal etch...???? Can't think back that far. About 10-15 years since used it.
It took the seam sealer off, the under coating off,the rubber coating on the wiring harness loom support along the fire wall, all the rust around the the rusty areas. even found pin holes along the rocker on the right side that was about to come through that i did'nt know was there.I was told that it would take aluminium off such as rivits and lead seam sealer.But safe to breath? After dipping,it should be a timing issue, they call and schedule pick up time, they pressure wash all the parts before pick up and recomend lightly heating all the seams,overlaps to get all moisture out.wiping and drying with metal prep-sol, lacquer thinner type degreaser. They also say you must use a sealing type primer.this should all be done within 3 days depending on the humidity.as rust never sleeps.
That looks good. I did a 53 Ford truck like that a few years back and it is definitely easier that hand sanding or stripping. The problem is, as you mentioned, you will probably see a lot more rust holes than you thought you had. Be sure to get all of the chemical out of seams where metal overlaps. I recently bought an undercoating gun from Eastwood Tools, they call it an undercoating system. It comes with different length wands and angled nozzles that let you get into hidden spots. You might want to get one to coat inside the rockers and cowl area unless you already have some way to do that. It cost $50. Be sure to post some pics as you go to keep the rest of us energised.